
[iOS, SwiftUI] iOS16 WidgetKit (iPhone LockScreen & Watch)
iOS16 WidgetKit

- 아이폰의 잠금 화면에서 3가지 형태(원형태, 직사각형형태, 텍스트인라인형태)의 위젯 추가 가능
- 아이폰의 위젯을 이용하여 애플워치의 위젯으로 같이 사용 가능하도록 개발 가능
Example SourceCode
https://github.com/tigi44/WidgetKitExample
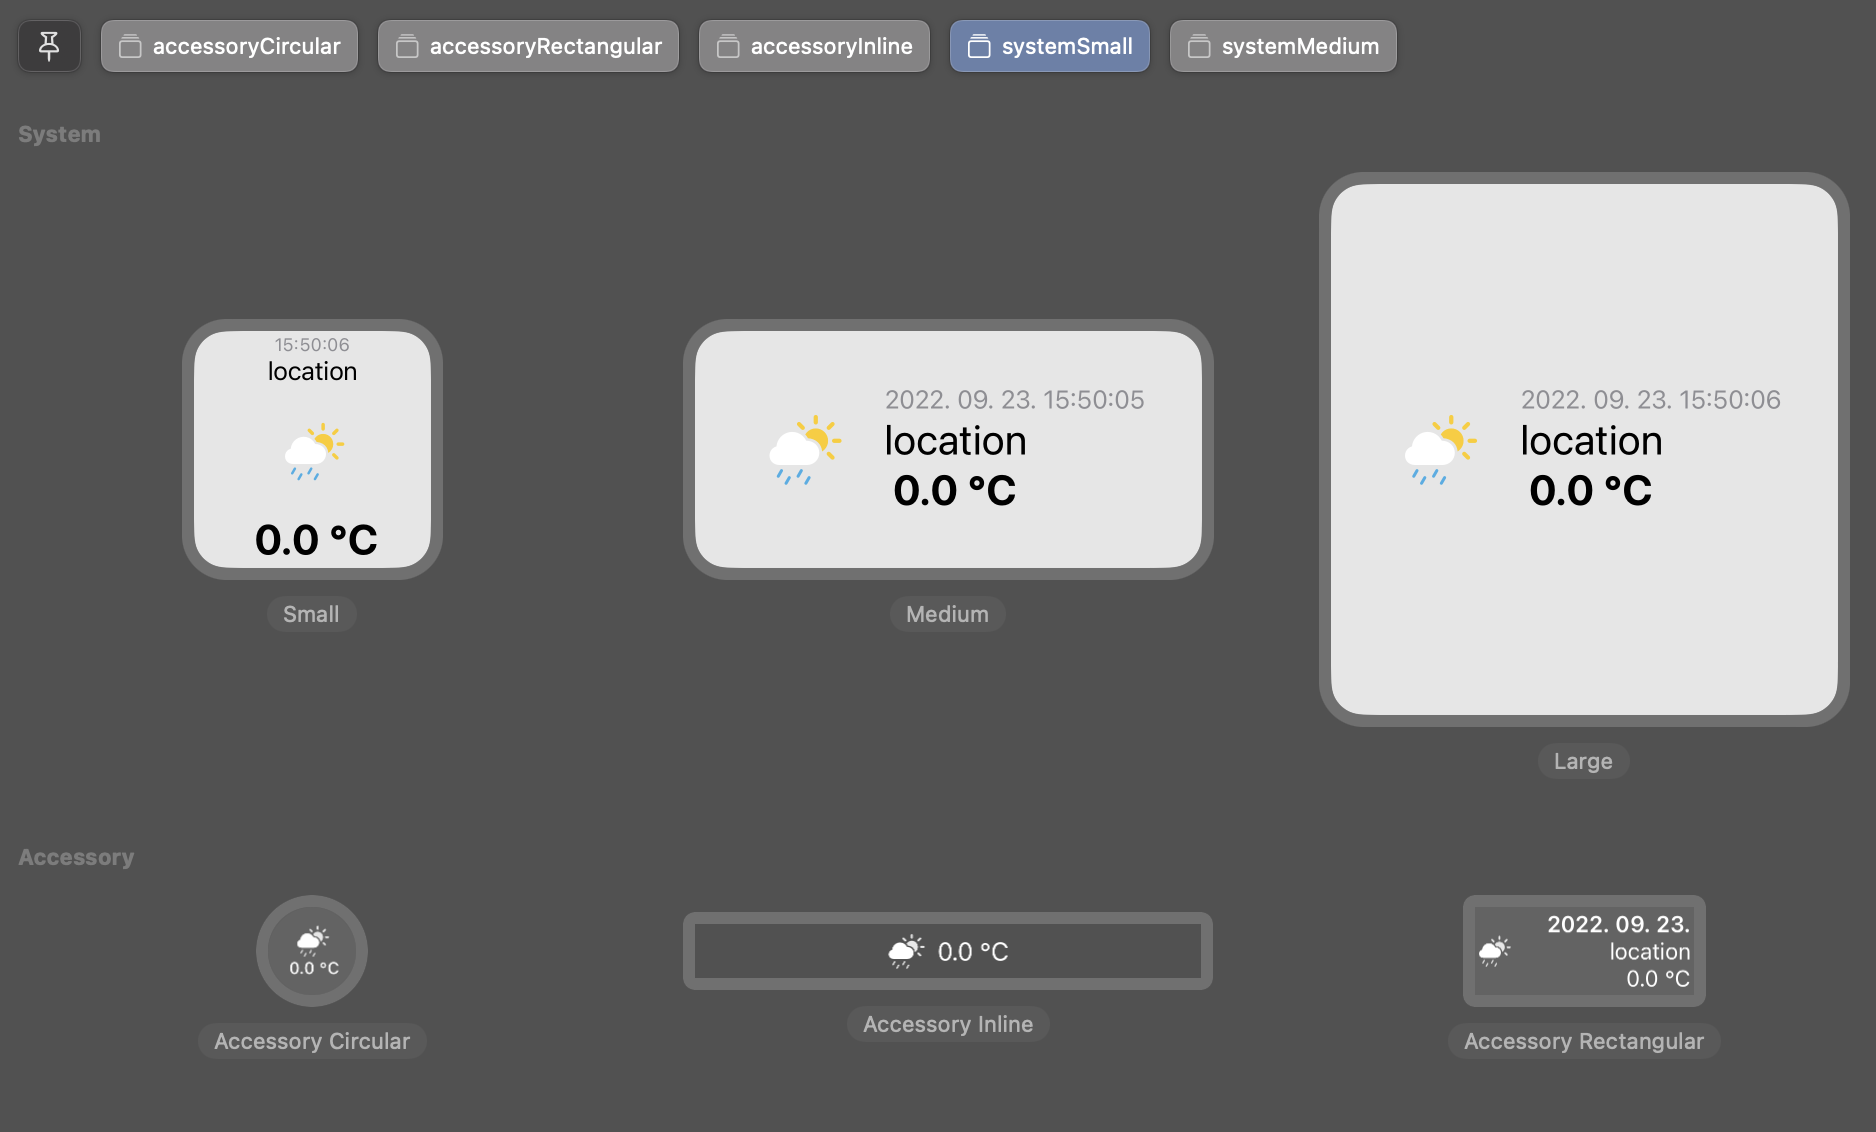
Lock Screen on iPhone
- 기존 앱에서 만들어논 WidgetKit을 사용한 위젯을 이용하여, 잠금화면에서도 추가할 수 있는 새로운 형태의 위젯사이즈가 추가됨
- WidgetFamily
- accessoryCircular : 원형 위젯
- accessoryRectangular : 사각형 위젯
- accessoryInline : 텍스트 인라인 위젯
- WidgetFamily
- 기존 widget view 영역에서 새로운 사이즈의 view 구현 추가 필요
WidgetKit Example
-
iOS16 WidgetKit Previews
1. Declare Supported Accessory Widget Families
struct WeatherWidget: Widget {
    let kind: String = "WeatherWidget"

    var body: some WidgetConfiguration {
        StaticConfiguration(kind: kind, provider: WeatherWidgetProvider()) { entry in
            WeatherWidgetEntryView(entry: entry)
        }
        .configurationDisplayName("Weather Widget")
        .description("This is an weather widget")
        .supportedFamilies([.accessoryCircular, .accessoryRectangular, .accessoryInline, .systemSmall, .systemMedium])
    }
}
2. Create Views for Accessory Widgets
struct WeatherWidgetEntryView : View {
    @ar entry: Provider.Entry

    @Environment(\.widgetFamily) var family

    @ViewBuilder
    var body: some View {
        switch family {
          case .accessoryCircular:
              WeahterAccessoryCircularView(entry: entry)
          case .accessoryRectangular:
              WeahterAccessoryRectangularView(entry: entry)
          case .accessoryInline:
              WeahterAccessoryInlineView(entry: entry)
          case .systemSmall:
              WeahterSmallView(entry: entry)
          case .systemMedium:
              WeahterMediumView(entry: entry)
          default:
            // Code to construct the view for other widgets; for example, the system large widgets.
        }
    }
}
3. Set a Consistent Background Color
- AccessoryWidget상에서 일관된 배경을 설정하기 위해 제공
- AccessoryWidgetBackground()를 통해 배경 설정 가능
ZStack {
     AccessoryWidgetBackground()
     VStack {
        Text(“MON”)
        Text(“6”)
         .font(.title)
    }
}
4. Make Sure Text Fits Available Space
- ViewThatFits : accessoryInline과 같은 위젯에서, 해당 공간 영역보다 view가 커질 경우, 공간에 맞도록 크기가 맞는 view를 선택하여 보여줌
ViewThatFits {
    Label(String(format: " %.1f °C + LongTextLongTextLongText", entry.temperature),
          systemImage: entry.icon)
    .symbolRenderingMode(.multicolor)

    Label(String(format: " %.1f °C + LongText", entry.temperature),
          systemImage: entry.icon)
    .symbolRenderingMode(.multicolor)

    Label(String(format: " %.1f °C", entry.temperature),
          systemImage: entry.icon)
    .symbolRenderingMode(.multicolor)
}
5. Support Applicable Rendering Modes
- vibrant : LockScreen에서의 위젯을 단색으로 불포화시키고, 배경화면에 맞게 조절
- fullColor : WatchOS에서 사용되며, 그라디언트와 풀컬러 이미지, 텍스트 및 게이지 사용
- accented : WatchOS는 위젯의 뷰 계층을 악센트 그룹과 기본 그룹으로 놔눠서 단색을 적용, .widgetAccentable()를 이용하여 악센트 그룹으로 지정 가능
var body: some View {
   ZStack {
       switch renderingMode {
       case .fullColor:
           // Create views for full-color widgets and watch complications.
       case .accented:
           // Create views and group applicable views in the accented group.
           VStack {
               // ...
           }
           .widgetAccentable()
       case .vibrant:
           // Create views for Lock Screen widgets on iPhone.
   }
}
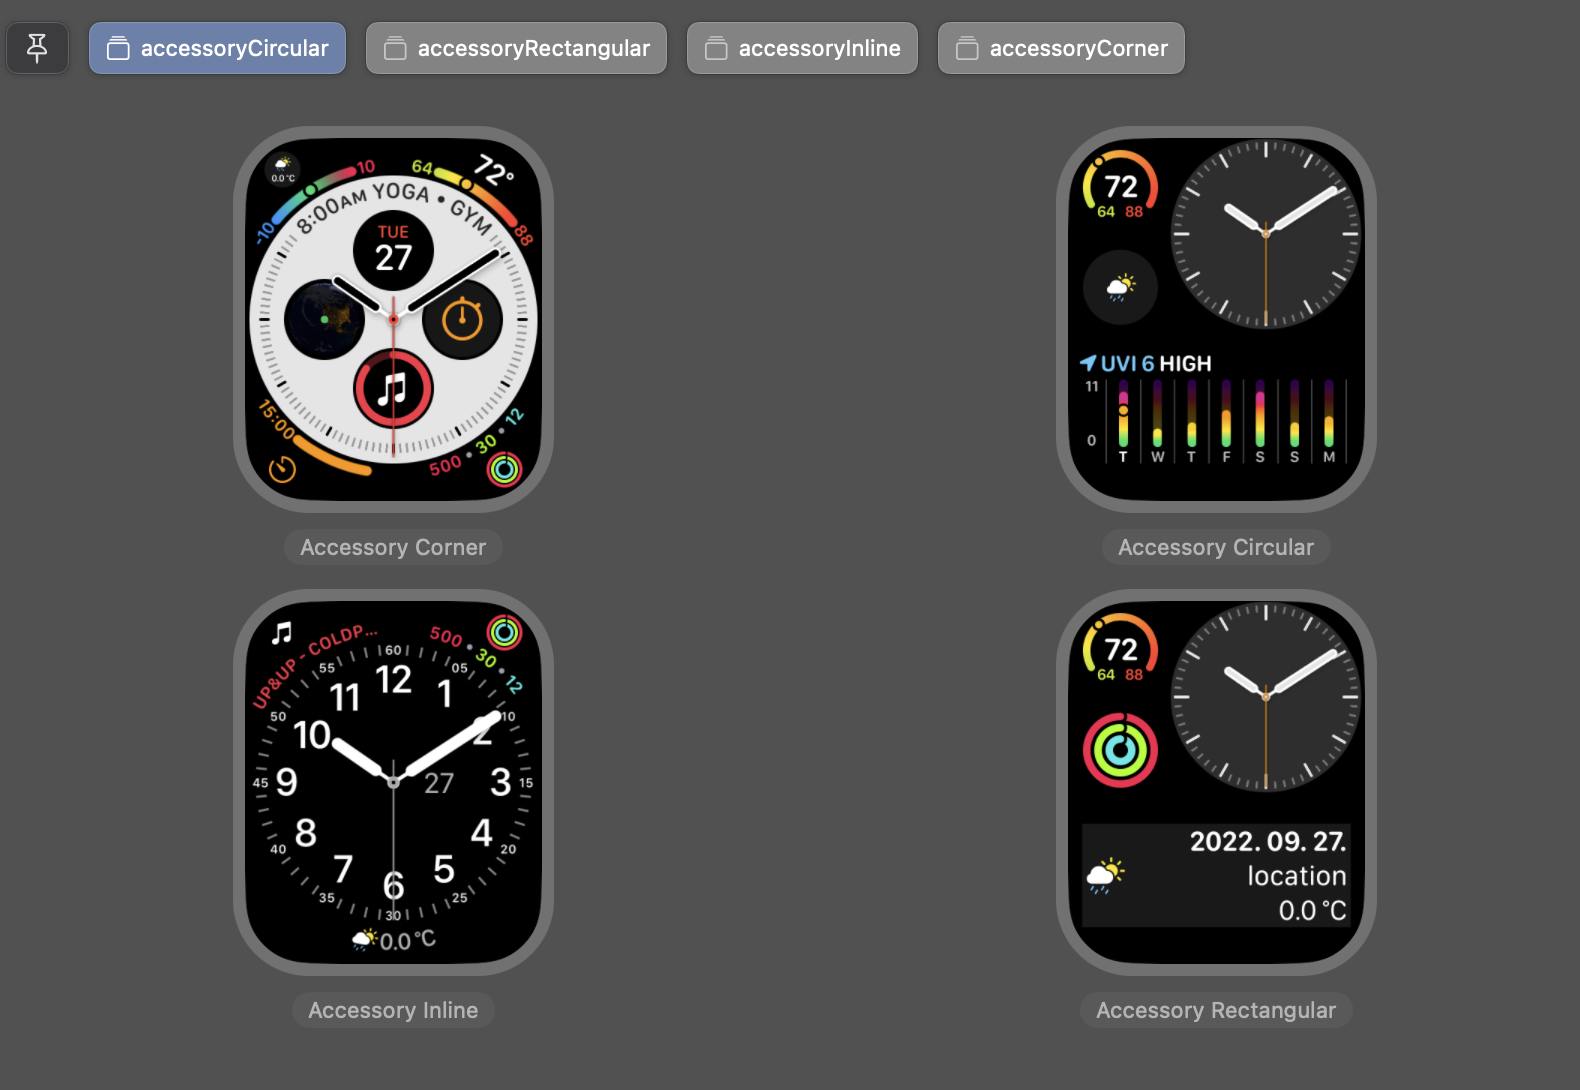
WatchOS Complications
- 기존 WatchOS에서는 Complication 이라는 명칭으로 위젯 형태의 기능을 구현해왔음
- 이번 iOS16부터 Complication을 WidgetKit의 한 형태로 포함시켜서 구현 가능하도록 함
-
WidgetKit에 새롭게 추가되는 accessory사이즈 값들로 구현, 기존 iOS앱의 위젯을 활용하여 WatchOS에서 위젯 구현 가능
- WidgetFamily
- accessoryCorner : 시계 주위 위젯, WatchOS 전용
- accessoryCircular, accessoryRectangular, accessoryInline 는 iOS쪽과 동일하게 사용
Watch Widget Extension
- iOS16 Watch WidgetKit Previews
0. Add a Watch Widget Extension
- Watch App용 Target 추가
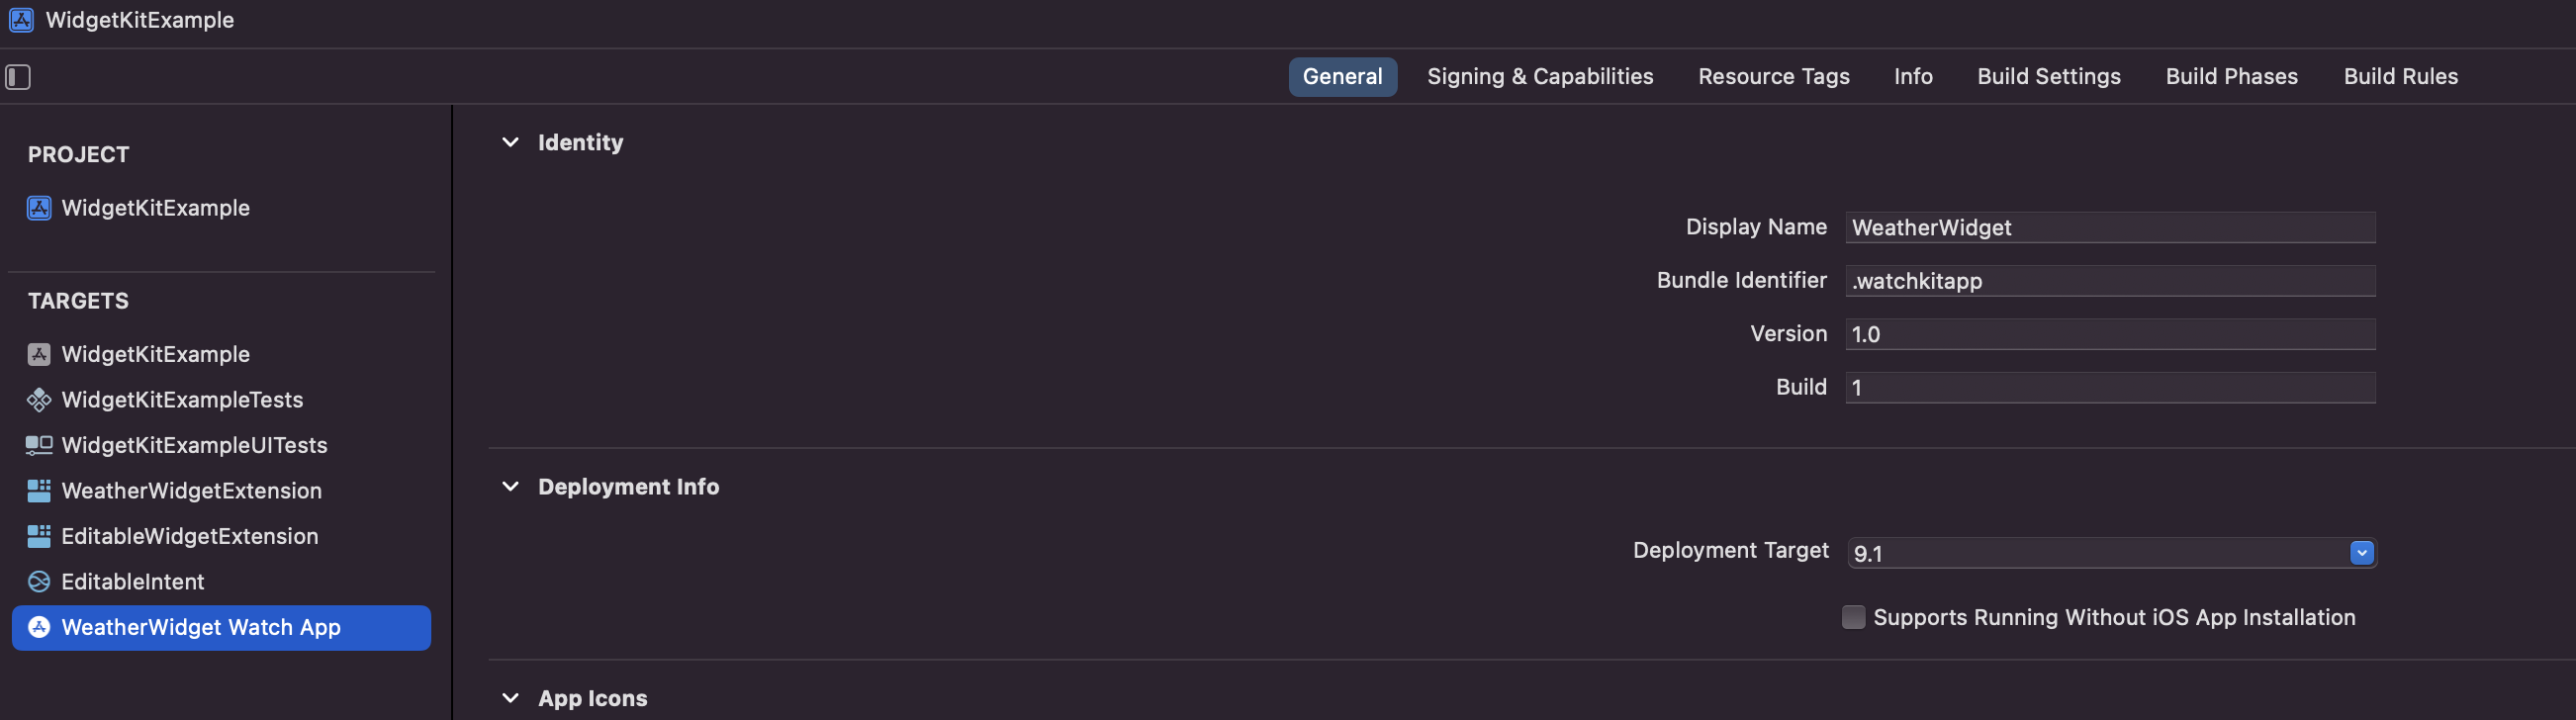
- iOS용으로 만들었던 WidgetExtension 복사
- Watch WidgetExtension Target 명칭 수정
- 같이 생성된 plist 파일 명 수정 및 Watch WidgetExtension Target내의 build settings 화면에서 수정된 plist 파일명으로 반영
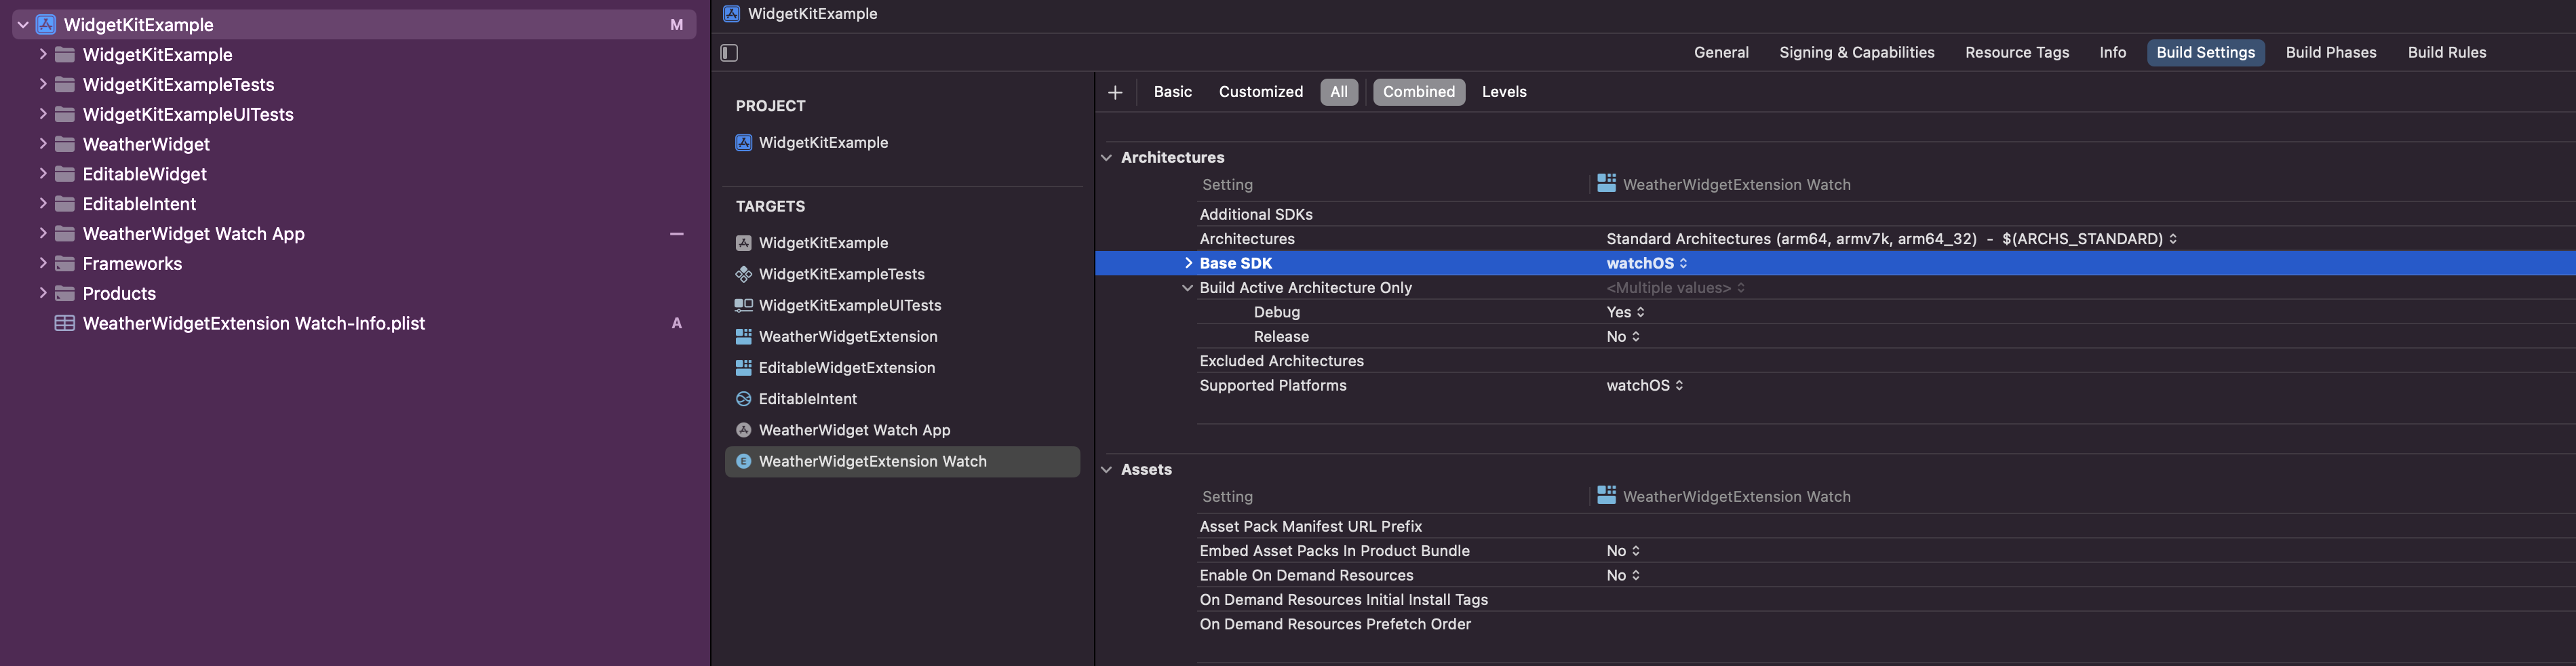
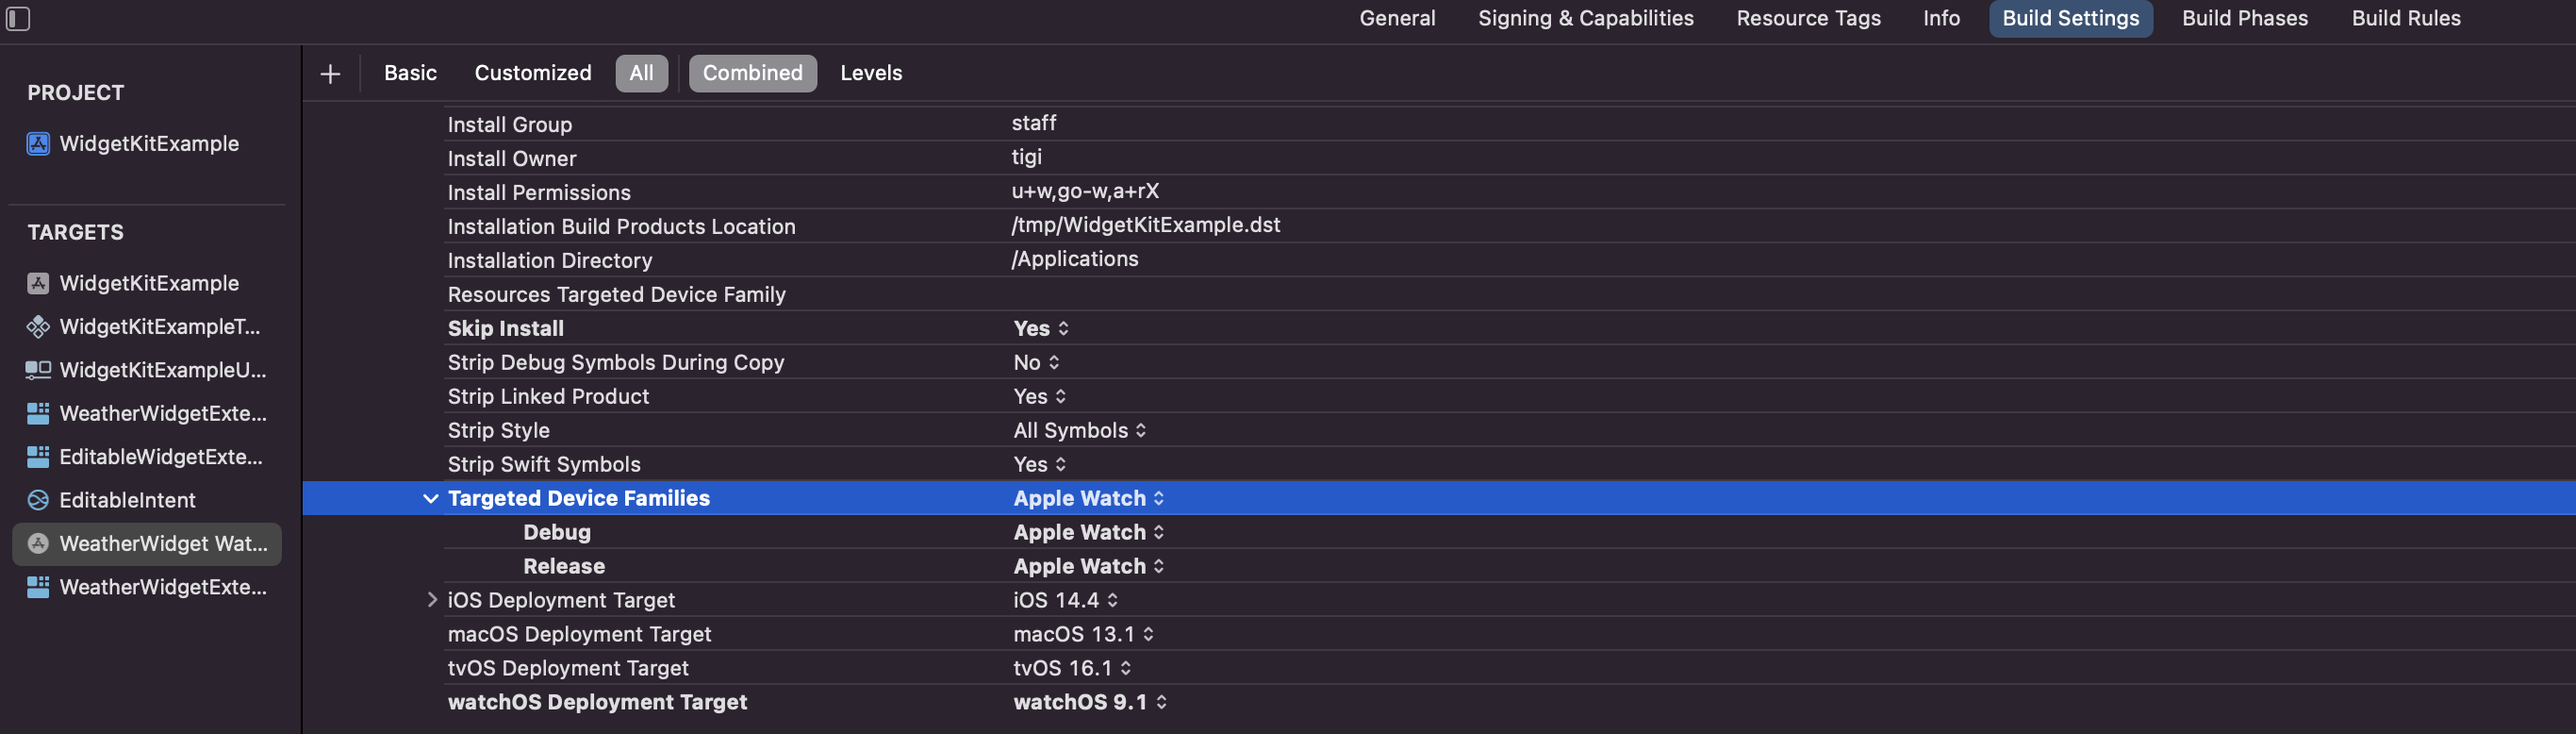
- Watch WidgetExtension Target의 based sdk를 watchOS로 수정

- build settings내의 TARGETED_DEVICE_FAMILY값을 Apple Watch로 수정
- WidgetExtension에 Watch WidgetExtension 연결
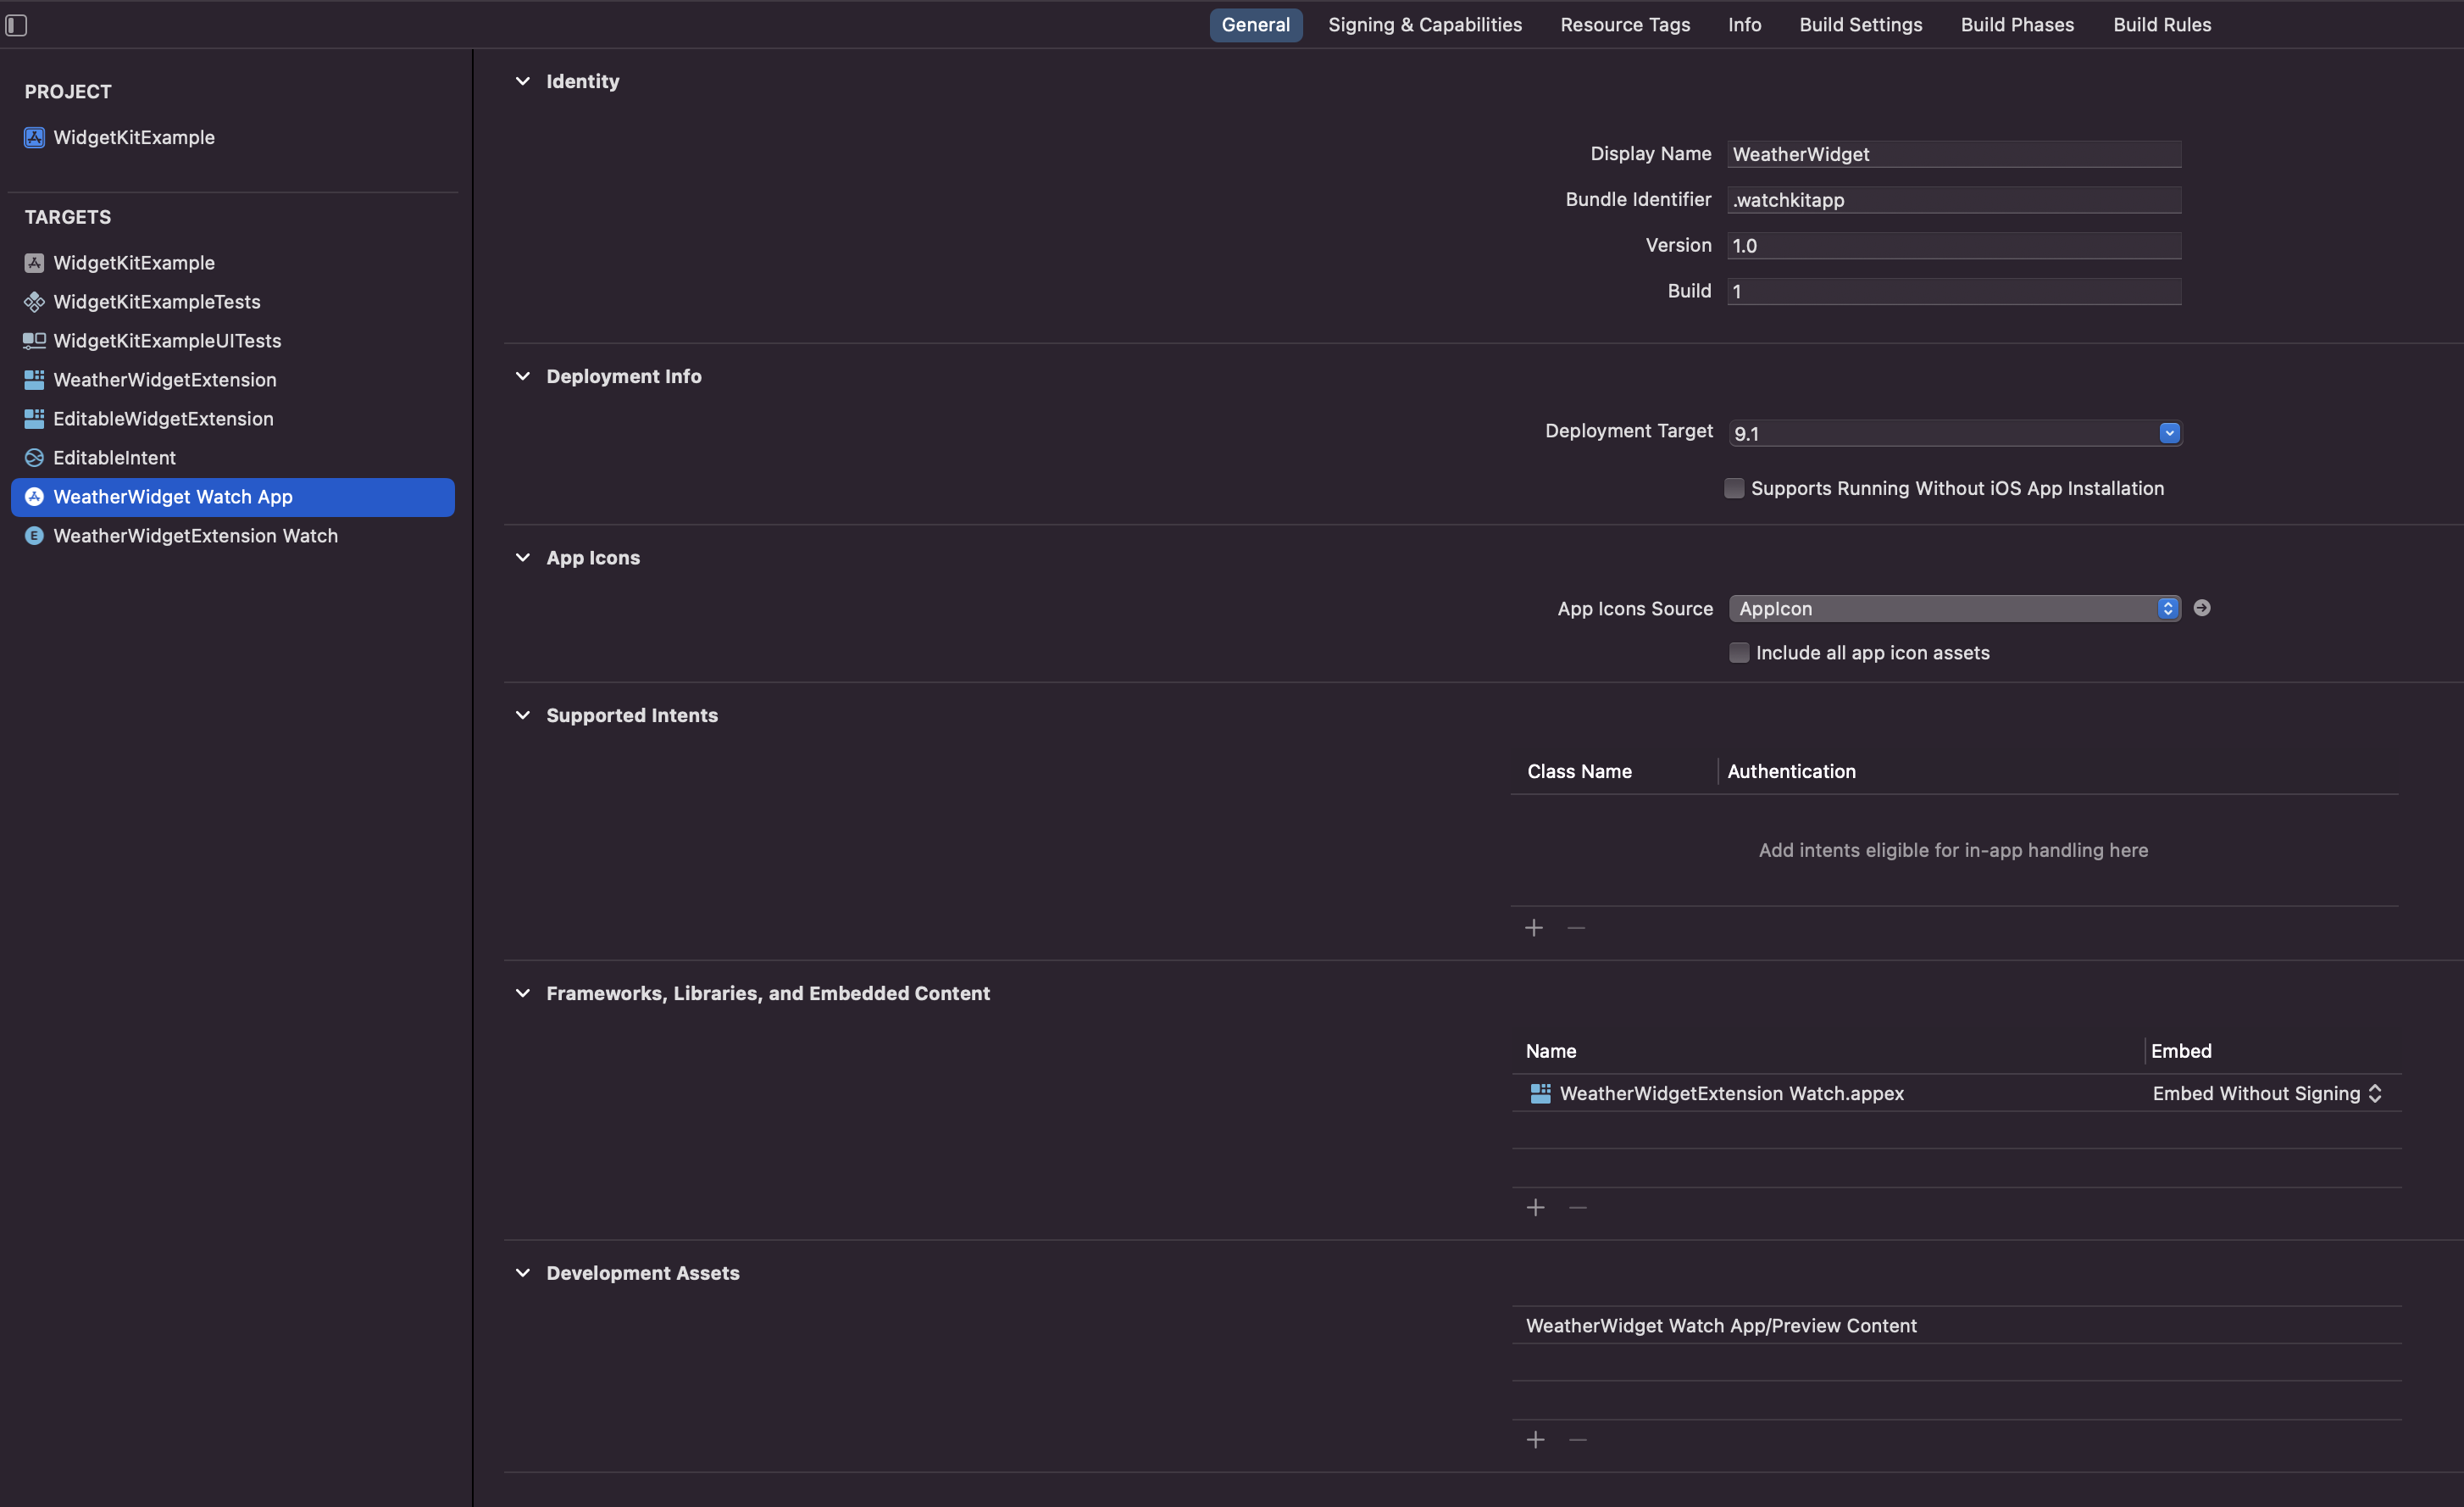
- 같이 생성된 plist 파일 명 수정 및 Watch WidgetExtension Target내의 build settings 화면에서 수정된 plist 파일명으로 반영
1. Declare Supported Accessory Widget Families
struct WeatherWidget: Widget {
    let kind: String = "WeatherWidget"

    var body: some WidgetConfiguration {
        StaticConfiguration(kind: kind, provider: WeatherWidgetProvider()) { entry in
            WeatherWidgetEntryView(entry: entry)
        }
        .configurationDisplayName("Weather Widget")
        .description("This is an weather widget")
#if os(watchOS)
        .supportedFamilies([.accessoryCircular, .accessoryRectangular, .accessoryInline, .accessoryCorner])
#else
        .supportedFamilies([.accessoryCircular, .accessoryRectangular, .accessoryInline, .systemSmall, .systemMedium])
#endif
    }
}
2. Create Views for Accessory Widgets
struct WeatherWidgetEntryView : View {
    @ar entry: Provider.Entry

    @Environment(\.widgetFamily) var family

    @ViewBuilder
    var body: some View {
        switch family {
          case .accessoryCircular:
              WeahterAccessoryCircularView(entry: entry)
          case .accessoryRectangular:
              WeahterAccessoryRectangularView(entry: entry)
          case .accessoryInline:
              WeahterAccessoryInlineView(entry: entry)
          case .accessoryCorner:
              WeahterAccessoryCornerView(entry: entry)

          ...
        }
    }
}
accessoryCorner
- widgetLabel : watchOS에서 accessoryCorner의 모서리 곡선 부분은, widgetLabel을 이용하여 text, gauge, progress view등으로 보여줄 수 있음
struct WeahterAccessoryCornerView: View {
        var entry: WeatherWidgetProvider.Entry

        var body: some View {
            ZStack {
                AccessoryWidgetBackground()

                VStack {
                    Image(systemName: entry.icon)
                        .symbolRenderingMode(.multicolor)
                        .widgetAccentable()

                    Text(String(format: " %.1f °C", entry.temperature))
                        .font(.caption2)
                }
            }
            .widgetLabel(label: {
                Gauge(value: entry.temperature, in: -10...10) {
                    Text(String(format: " %.1f °C", entry.temperature))
                } currentValueLabel: {
                    Text("\(entry.temperature)")
                } minimumValueLabel: {
                    Text("-10")
                        .foregroundColor(.blue)
                } maximumValueLabel: {
                    Text("10")
                        .foregroundColor(.pink)
                }
                .tint(Gradient(colors: [.blue, .green, .pink]))
            })
        }
    }
- showsWidgetLabel 환경변수값을 통해, 해당 위젯에서 widgetLabel이 보일 수 있는지 확인할 수 있음
@Environment(\.showsWidgetLabel) var showsWidgetLabel
#. Recommendations
- Intent를 이용한 Widget의 경우, IntentTimelineProvider 안에 구현된
func recommendations() -> [IntentRecommendation<Self.Intent>]을 통해 Intent 설정된 위젯들을 설정 목록에서 추천 가능
struct Provider: IntentTimelineProvider {

    ...

    func recommendations() -> [IntentRecommendation<ConfigurationIntent>] {
        let recommendation = ConfigurationIntent()
        recommendation.parameter = "recommendation"
        recommendation.enumparameter = .first

        return [recommendation].map { intent in
            return IntentRecommendation(intent: intent, description: intent.parameter ?? "editable")
        }
    }
}


Leave a comment