[iOS, Swift] Widget Extension (WidgetKit)
Widget Extension (WidgetKit)
- iOS 14 Widget

Example SourceCode
https://github.com/tigi44/WidgetKitExample
About Widget HIG
위젯은 단순히 앱을 여는 버튼이 아닌, 간략한 정보를 일정 주기로 업데이트하면서 보여주기 위한 용도
단순히 앱을 여는 단축키기능의 위젯은 사용자가 메인 홈 화면에 추가 하지 않는다….
위젯 사이즈는 스몰, 미디움, 라지 로 구분 (위젯 사이즈에 따른 가치를 두고 개발 지향, 사이즈에 맞는 정보 노출)
Widget
- Languge: SwiftUI + WidgetKit
- Data Share With App: UserDefaults, Keychain….

Widget Main
@main
struct WeatherWidget: Widget {
    let kind: String = "WeatherWidget"

    var body: some WidgetConfiguration {
        StaticConfiguration(kind: kind, provider: WeatherWidgetProvider()) { entry in
            WeatherWidgetEntryView(entry: entry)
        }
        .configurationDisplayName("Weather Widget")
        .description("This is an weather widget")
        .supportedFamilies([.systemSmall, .systemMedium])
    }
}
- kind
- configurationDisplayName
- description
- supportedFamilies :
.systemSmall,.systemMedium,.systemLarge
WidgetBundle : A container used to expose multiple widgets from a single widget extension.
@main
struct WeatherWidgetBundle: WidgetBundle {
    @WidgetBundleBuilder
    var body: some Widget {
        WeatherWidget()
        AirWidget()
    }
}
Provider
TimelineEntry
struct WeatherWidgetEntry: TimelineEntry {
    let date: Date
    let icon: String
    let location: String
    let temperature: Double
}
TimelineProvider
struct WeatherWidgetProvider: TimelineProvider {
    func placeholder(in context: Context) -> WeatherWidgetEntry {
        WeatherWidgetEntry(date: Date(), icon: "", location: "", temperature: 0)
    }

    func getSnapshot(in context: Context, completion: @escaping (WeatherWidgetEntry) -> ()) {
        let entry = WeatherWidgetEntry(date: Date(), icon: "01d", location: "location", temperature: 0)
        completion(entry)
    }

    func getTimeline(in context: Context, completion: @escaping (Timeline<Entry>) -> ()) {
        var entries: [WeatherWidgetEntry] = []

        let currentDate = Date()
        for secondOffset in 0 ..< 4 {
            let entryDate = Calendar.current.date(byAdding: .second, value: secondOffset * 10, to: currentDate)!
            let weatherData = WeatherLocalData[secondOffset]
            let entry = WeatherWidgetEntry(date: entryDate, icon: weatherData["icon"] as! String, location: weatherData["location"]  as! String, temperature: weatherData["temp"]  as! Double)
            entries.append(entry)
        }

        let timeline = Timeline(entries: entries, policy: .atEnd)
        completion(timeline)
    }
}
context (https://zeddios.tistory.com/1091) : isPreview, family, displaySize, environmentVariantes
- placeholder
- 위젯 데이터 로딩전의 디폴트값으로 노출 가능
- getSnapshot
- 위젯 설정 프리뷰 화면(위젯 갤러리)에서 호출
- getTimeline
- TimelineEntry를 통해 위젯 데이터 셋팅
- TimelineEntry에 설정된 date 시간에 위젯에 데이터 노출
- Timeline 상에 설정된 TimelineReloadPolicy 값에 따라 reload 실행
Timeline
var entries: [TimelineEntry] = []
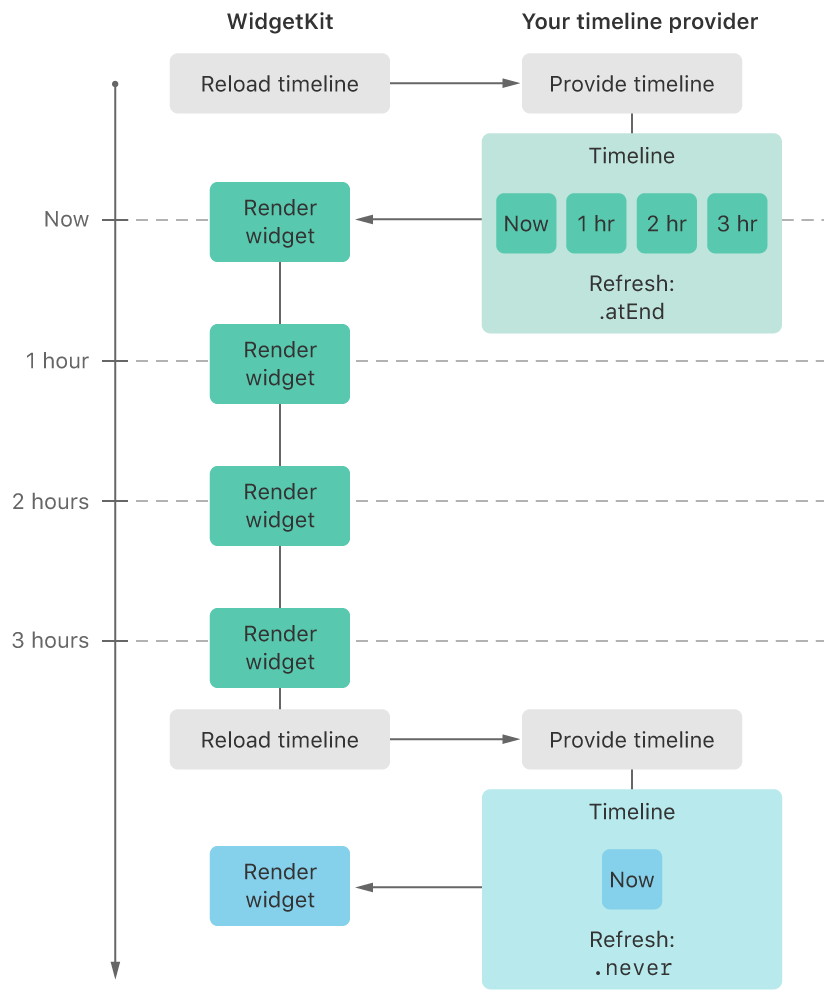
let timeline = Timeline(entries: entries, policy: .atEnd)
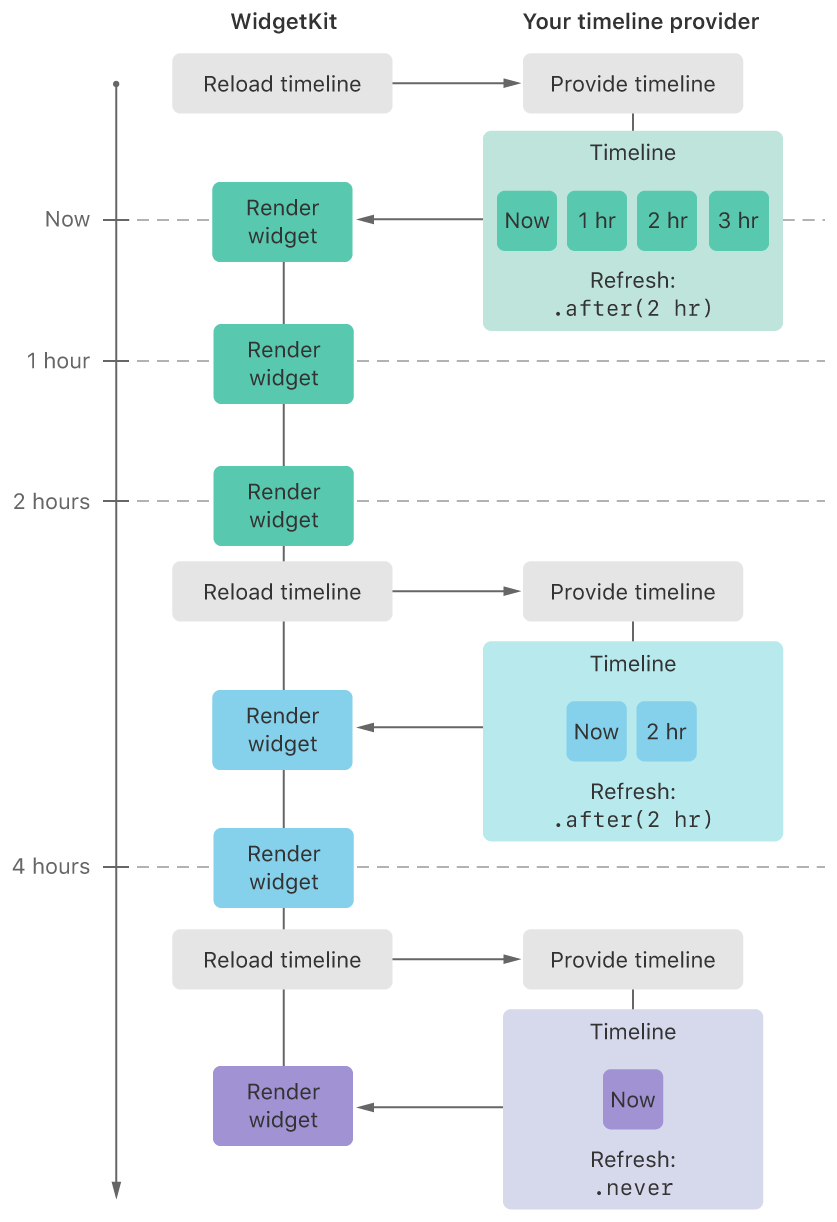
- TimelineEntry 배열과 TimelineReloadPolicy값을 갖고 있는 객체
- TimelineReloadPolicy
-
atEnd : TimelineEntry 배열을 모두 실행하고 난 후 reload
-
after(date) : TimelineEntry 배열 실행여부와 상관 없이 특정 시간 후 reload
-
never : TimelineEntry 배열만 실행
-
View
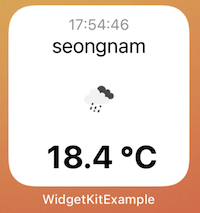
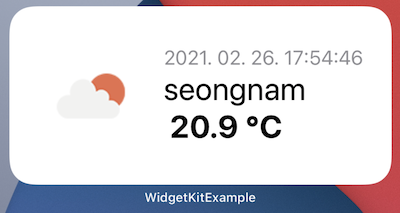
struct WeatherWidgetEntryView : View {

    var entry: WeatherWidgetProvider.Entry
    @Environment(\.widgetFamily) var family

    ...

    var body: some View {
        switch family {
        case .systemSmall:
            WeahterSmallView(entry: entry)
        default:
            WeahterMediumView(entry: entry)
        }
    }
}
Environment: widgetFamily (위젯 크기별 구분 가능)
- .systemSmall
- .systemMedium
- .systemLarge
Widget view size
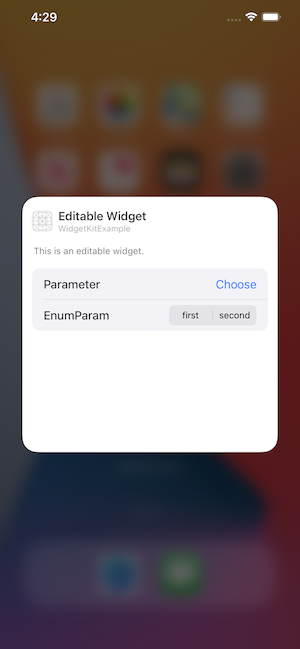
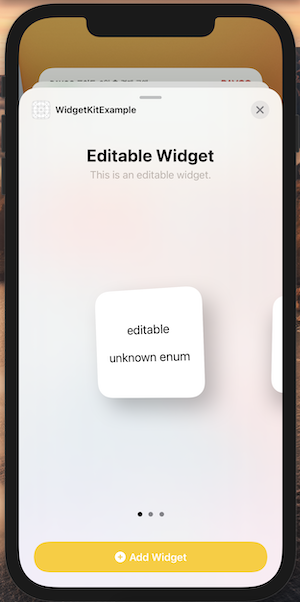
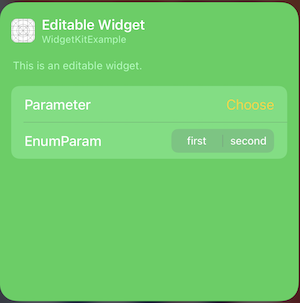
Configuration Widget (Editable Widget)

Create Intent Definition
-
create a custom intent definition in a widget

-
create the intent configuration and setting parameters
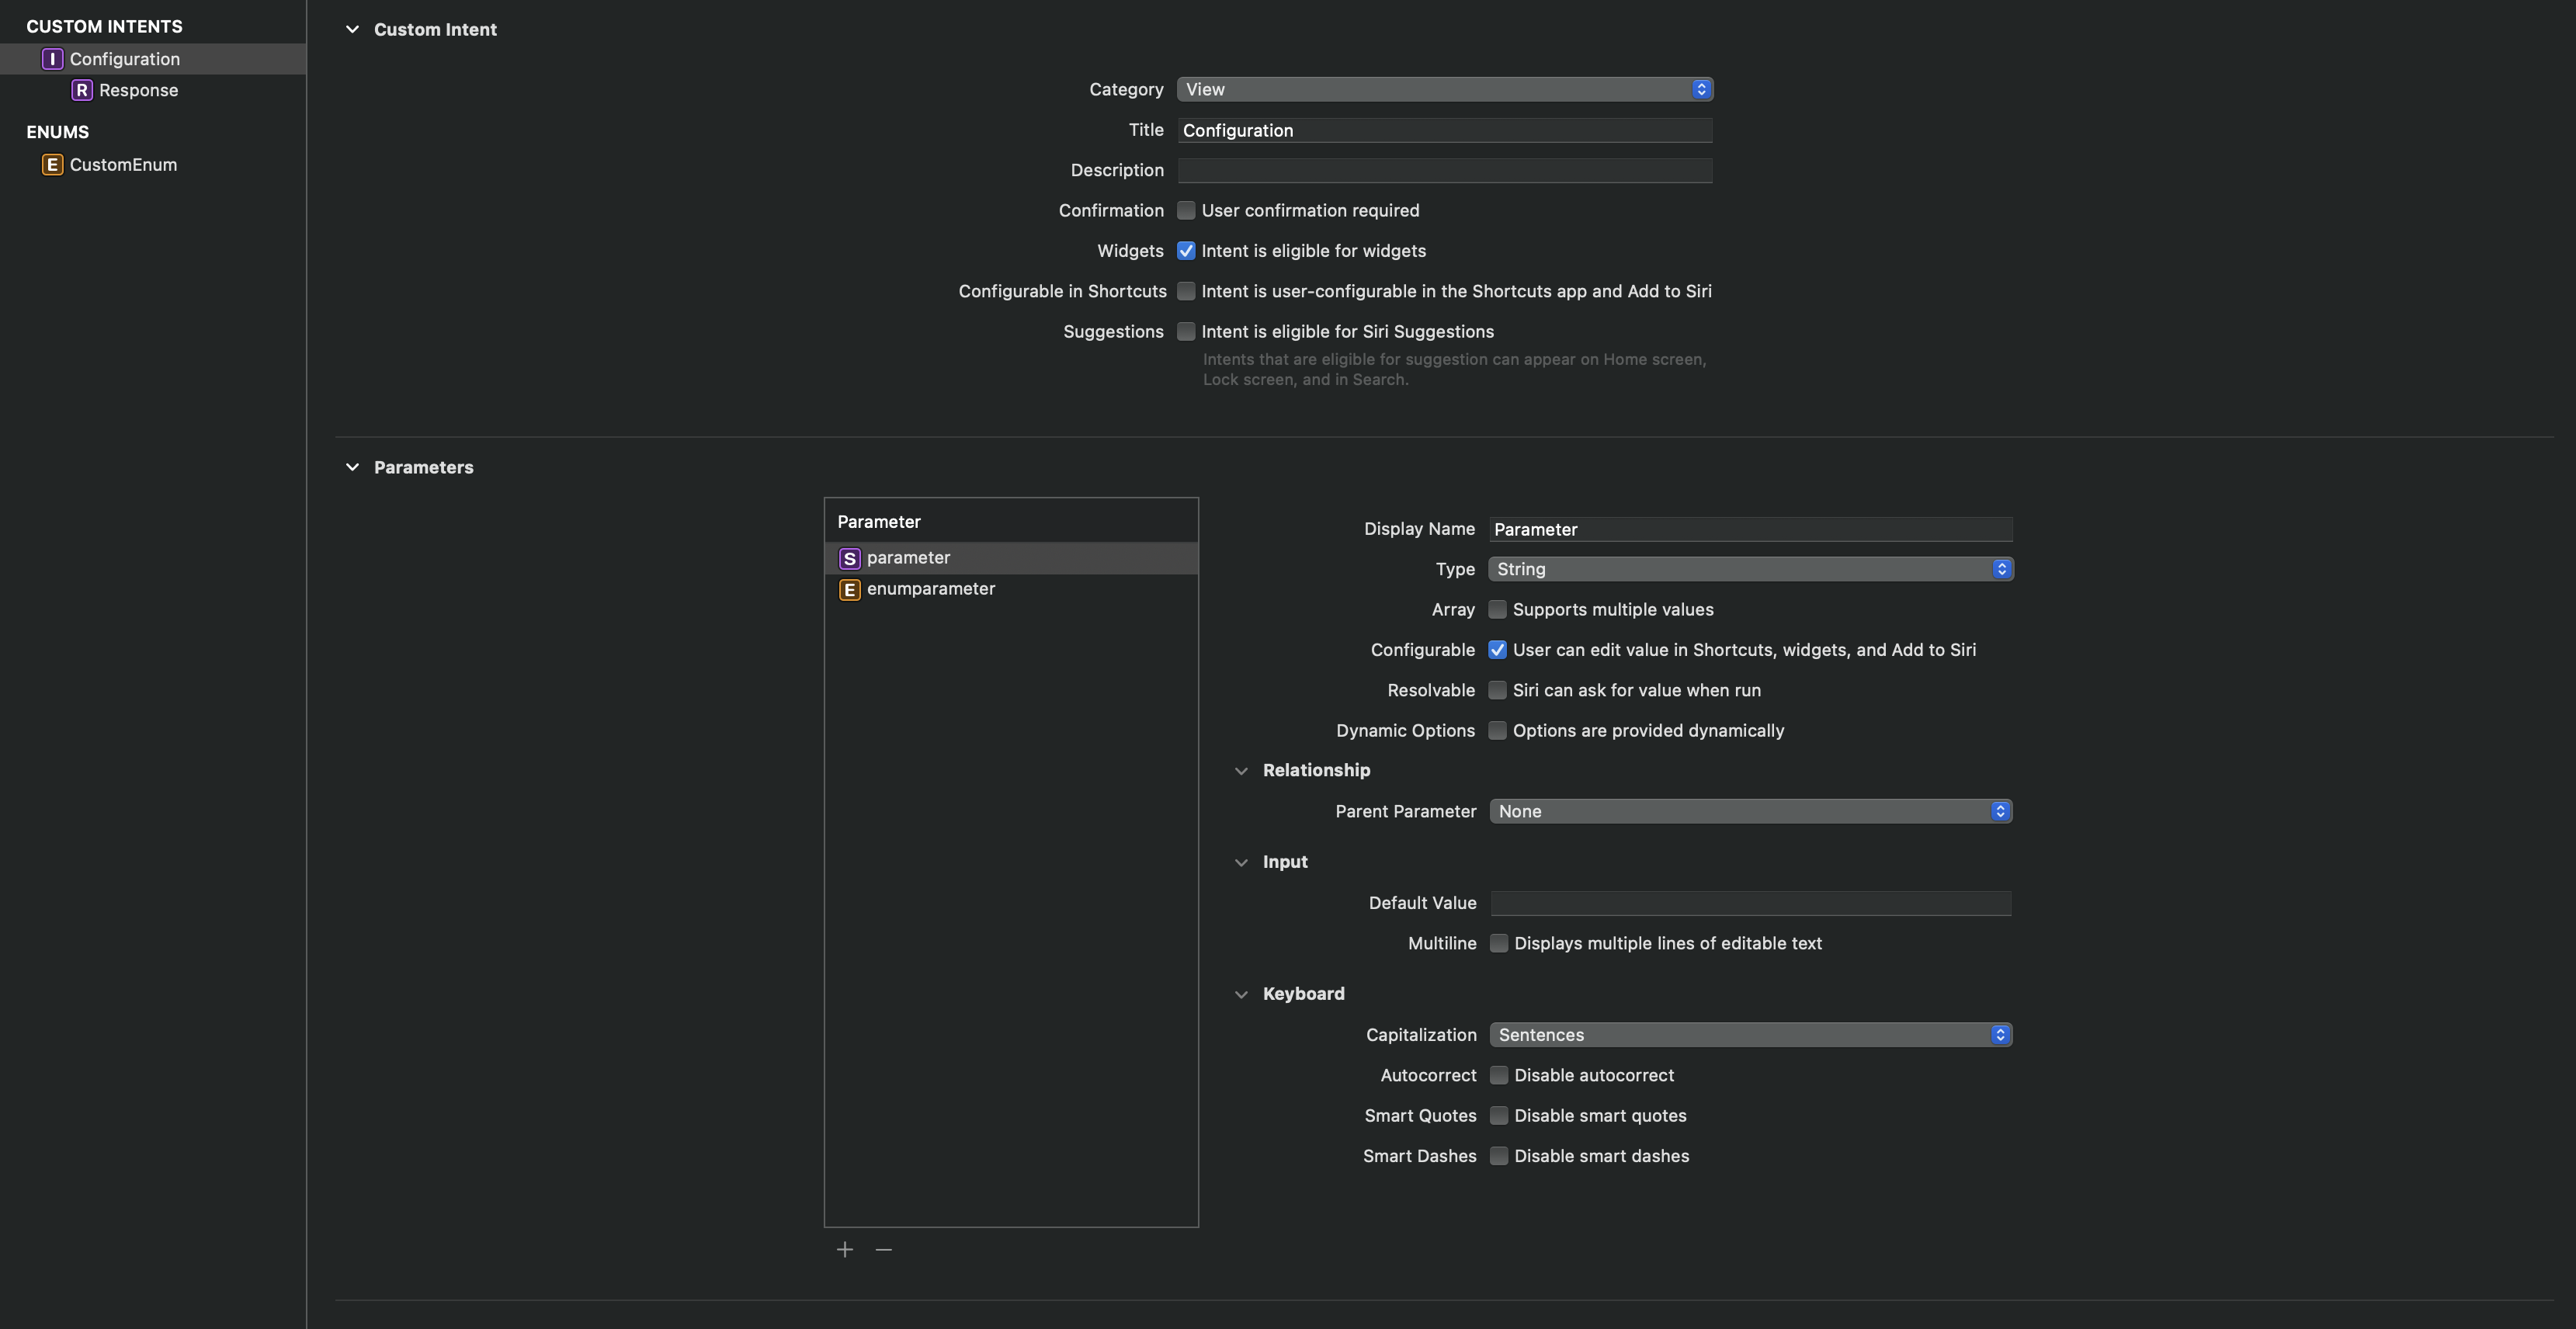
Intent Widget Main
- Widget에서 StaticConfiguration 대신, IntentConfiguration 사용
- intent는 위에서 만든 커스텀 intent type 사용
@main
struct EditableWidget: Widget {
    let kind: String = "EditableWidget"

    var body: some WidgetConfiguration {
        IntentConfiguration(kind: kind, intent: ConfigurationIntent.self, provider: Provider()) { entry in
            EditableWidgetEntryView(entry: entry)
        }
        .configurationDisplayName("Editable Widget")
        .description("This is an editable widget.")
    }
}
Intent Provider
- TimelineProvider 대신, IntentTimelineProvider 사용
- configuration에 커스텀 intent type 사용
struct Provider: IntentTimelineProvider {
    func placeholder(in context: Context) -> SimpleEntry {
        SimpleEntry(date: Date(), configuration: ConfigurationIntent())
    }

    func getSnapshot(for configuration: ConfigurationIntent, in context: Context, completion: @escaping (SimpleEntry) -> ()) {
        let entry = SimpleEntry(date: Date(), configuration: configuration)
        completion(entry)
    }

    func getTimeline(for configuration: ConfigurationIntent, in context: Context, completion: @escaping (Timeline<Entry>) -> ()) {
        var entries: [SimpleEntry] = []

        let currentDate = Date()
        for hourOffset in 0 ..< 5 {
            let entryDate = Calendar.current.date(byAdding: .hour, value: hourOffset, to: currentDate)!
            let entry = SimpleEntry(date: entryDate, configuration: configuration)
            entries.append(entry)
        }

        let timeline = Timeline(entries: entries, policy: .atEnd)
        completion(timeline)
    }
}
Intents Extension (Dynamic parameter options)
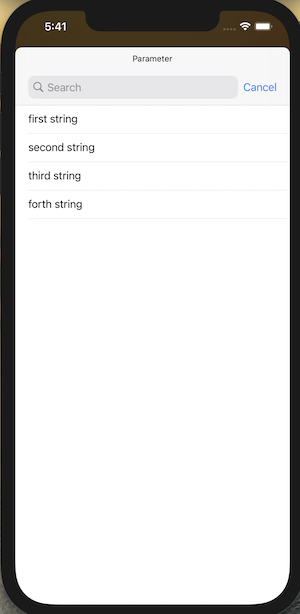
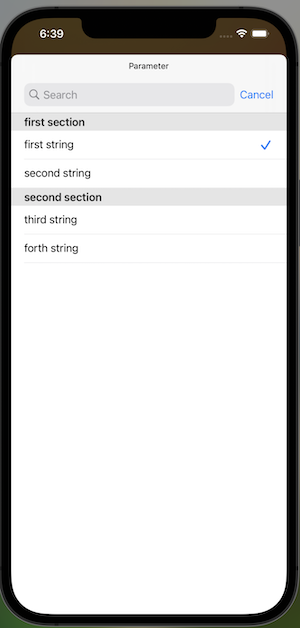
- 커스텀하게 만든 Intent에서 parameter값을 동적 리스트로 변경하여 사용하고 싶다면,
Intents Extensiontarget을 추가하여 사용 -
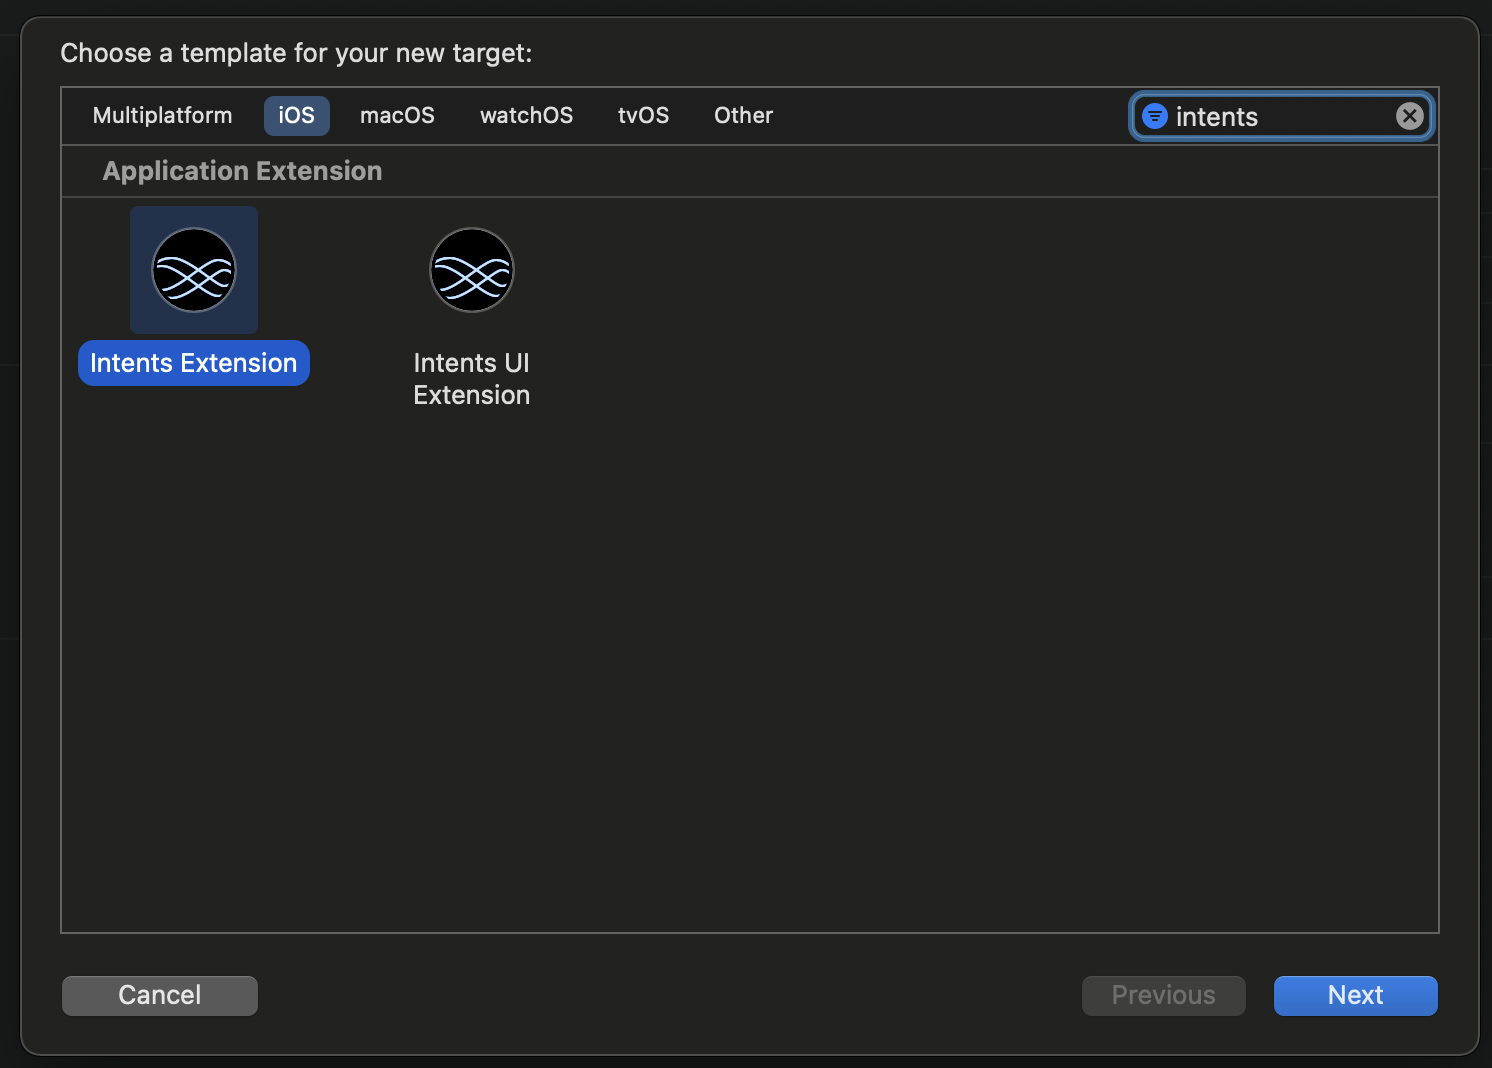
create a target : intents extension
-
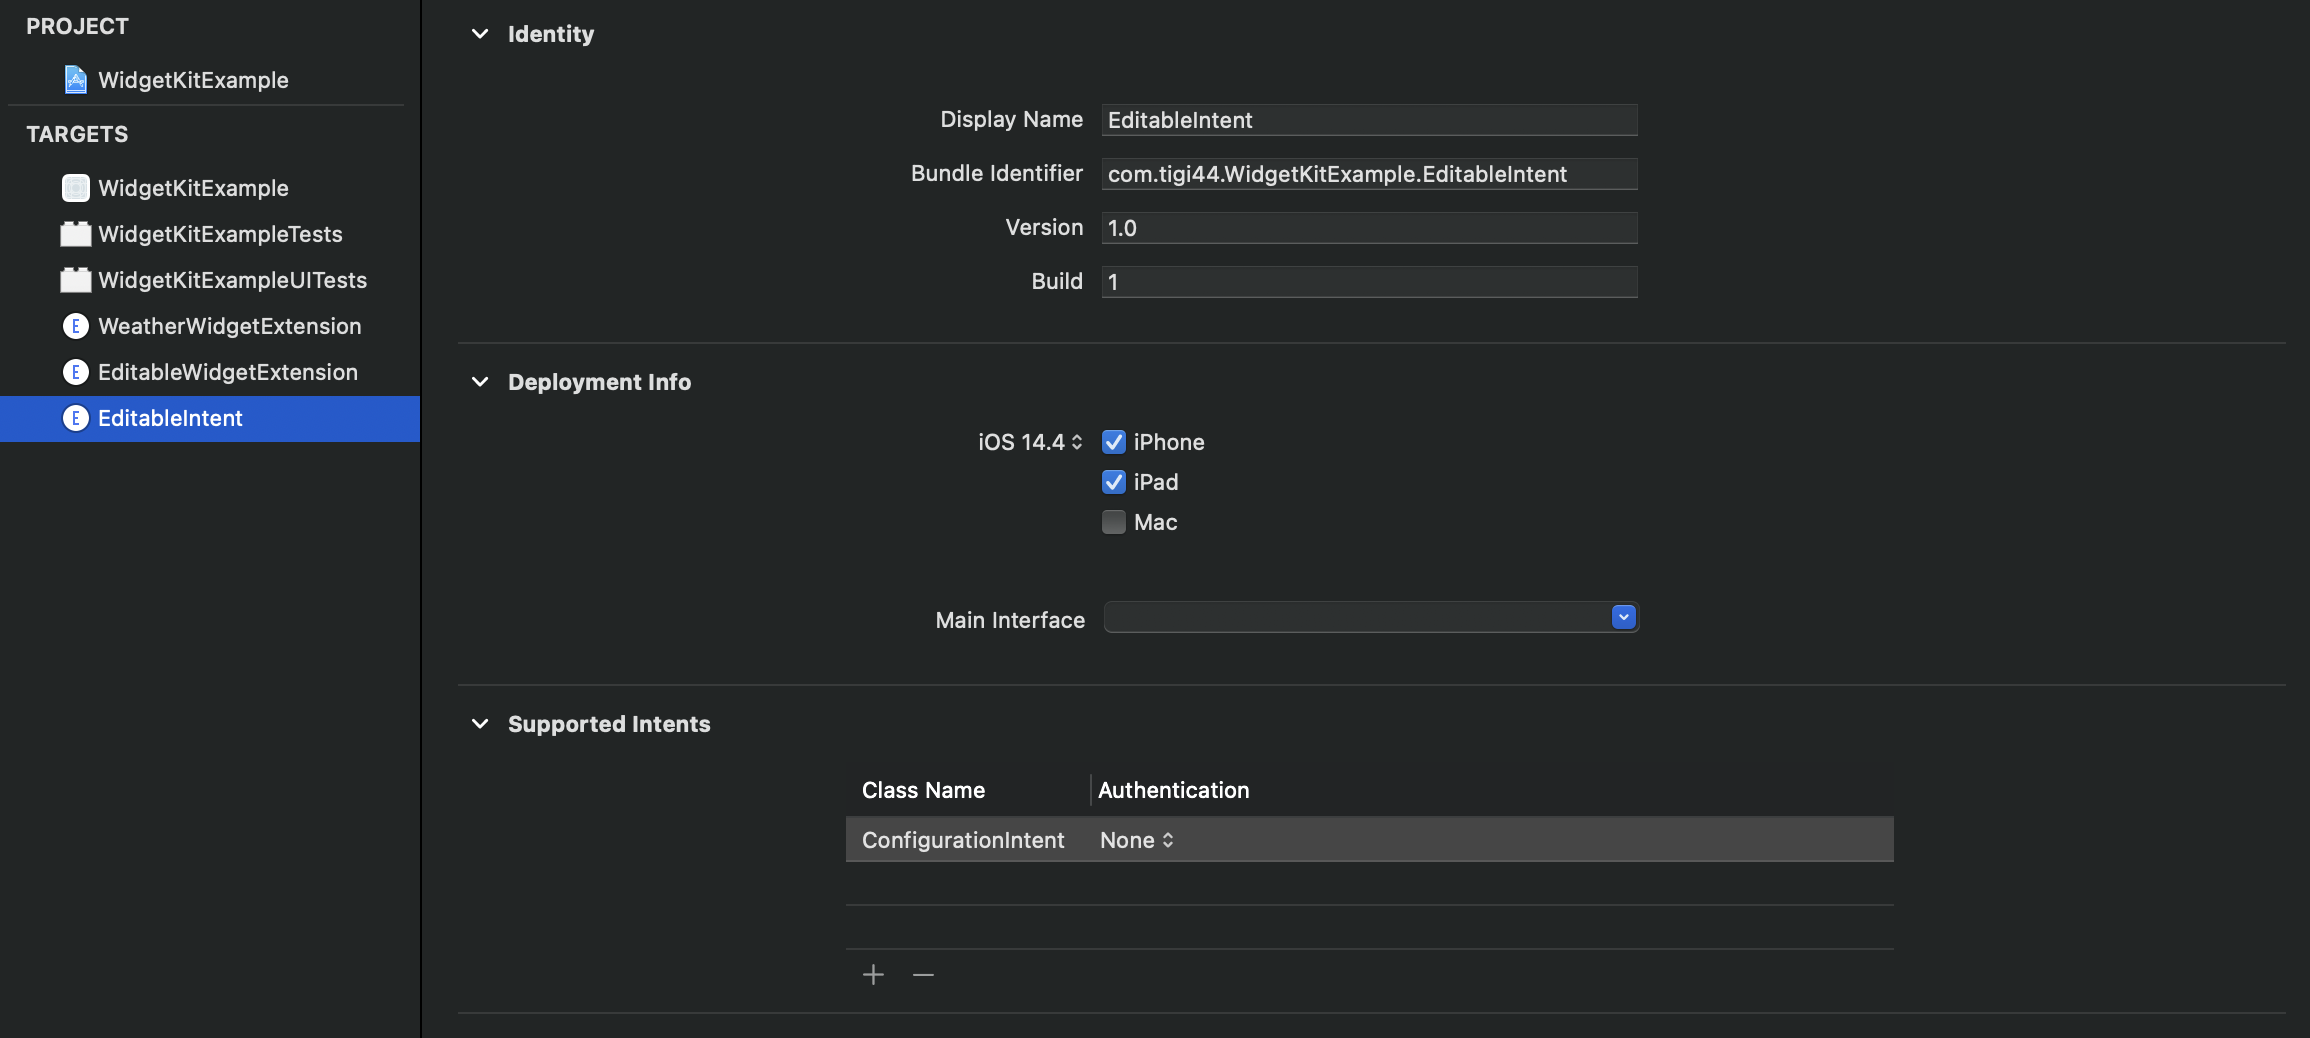
add the custom intent into supported intents
-
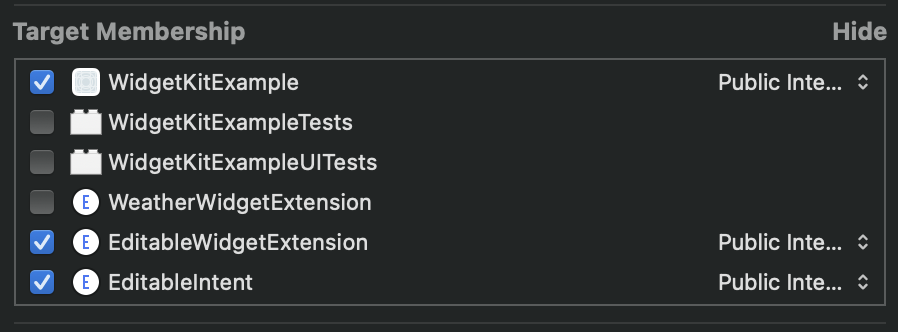
setting target membership of the intentdefinition of the custom intent
-
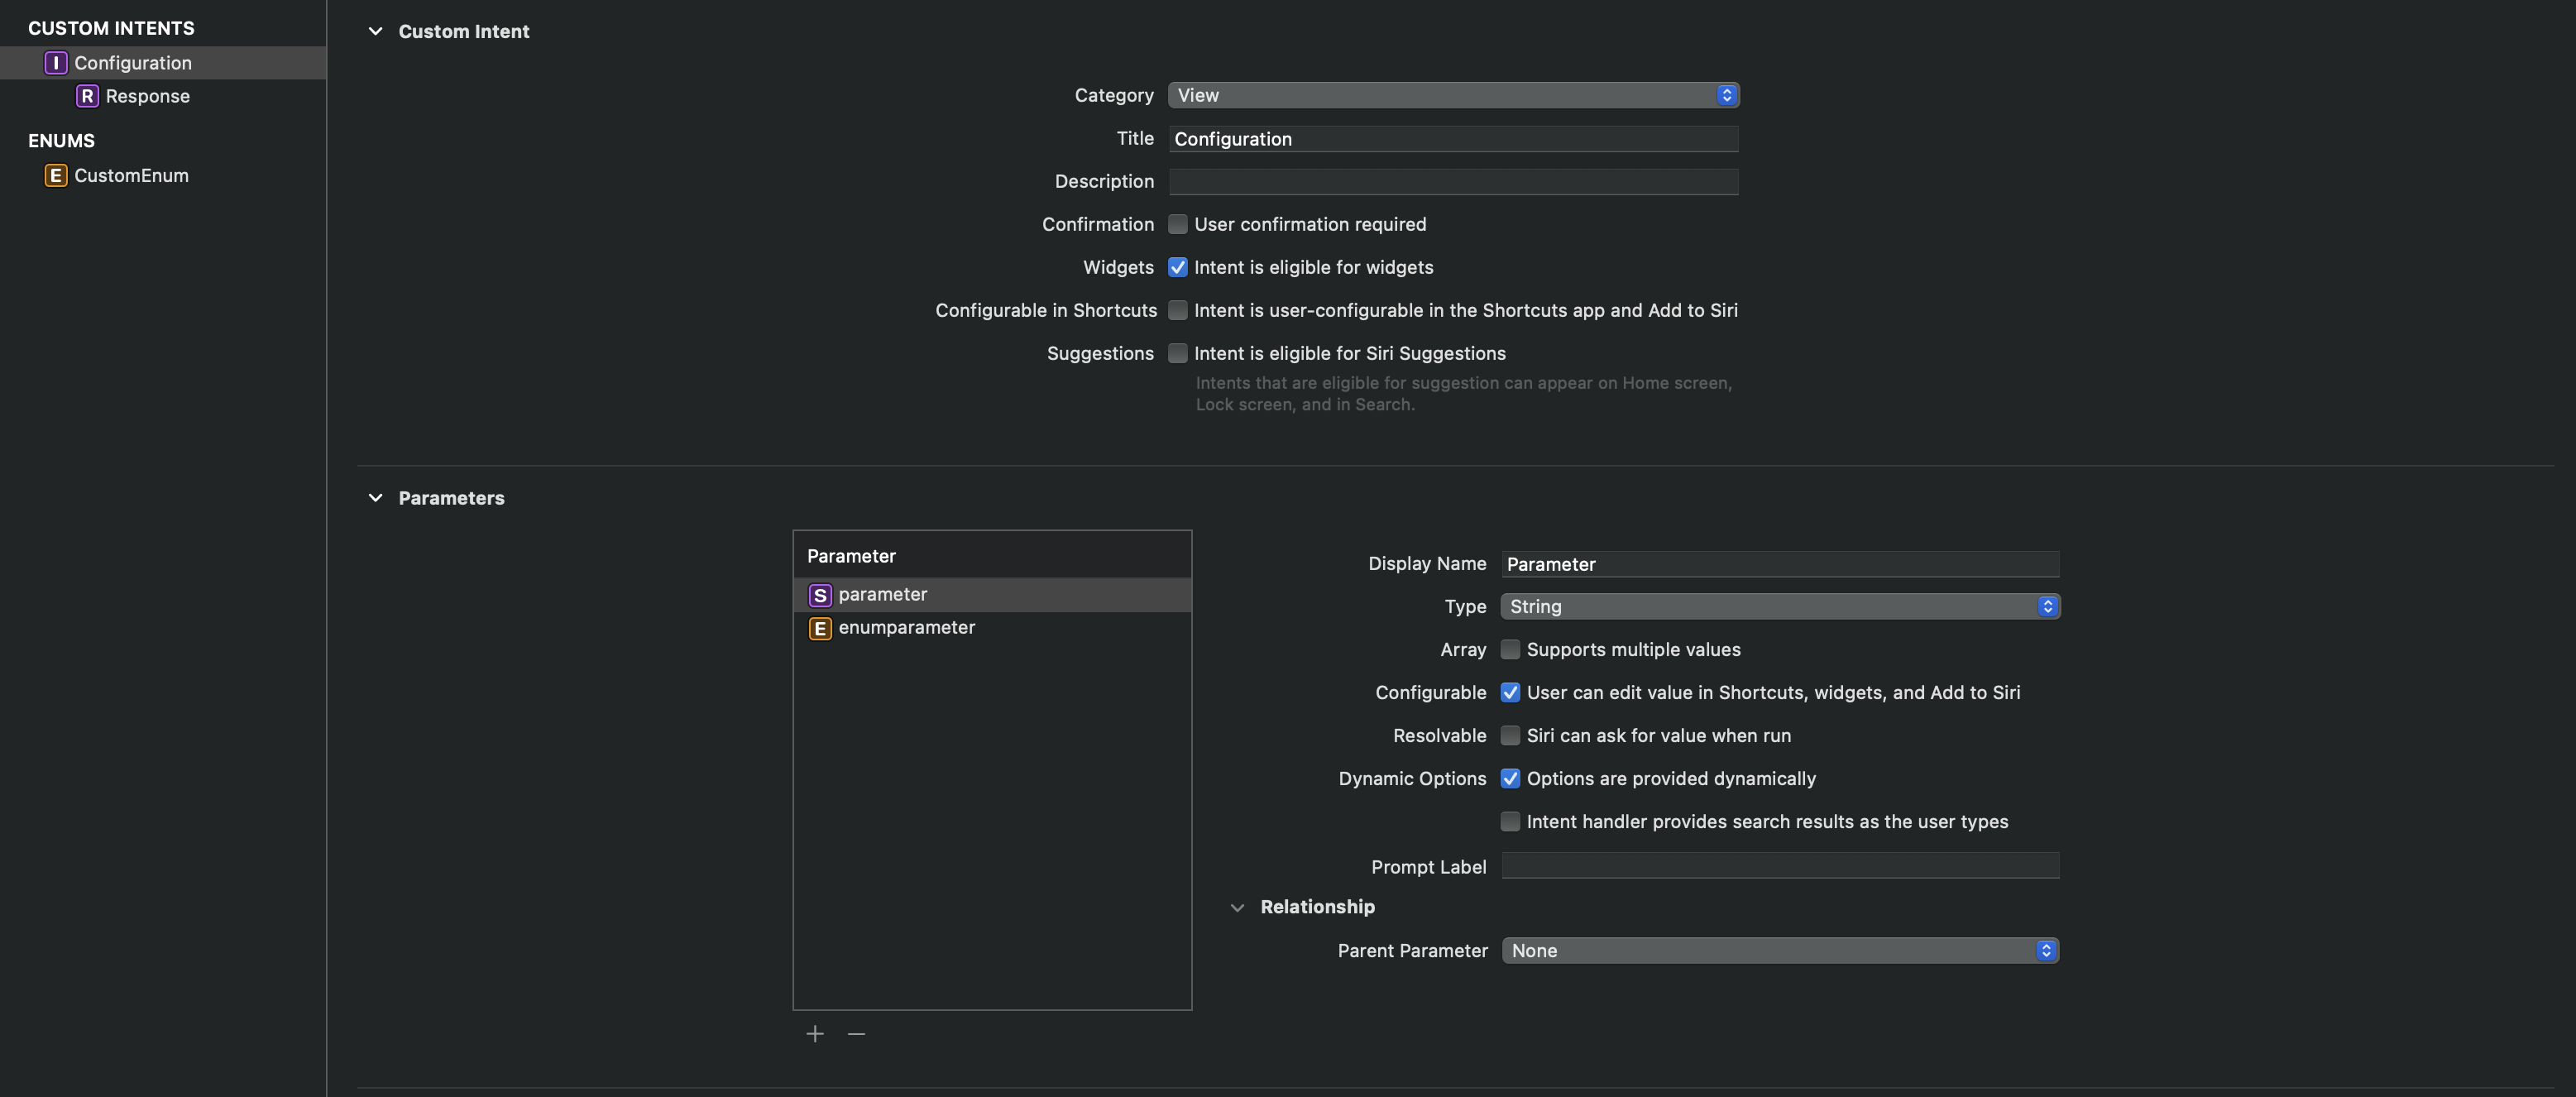
setting dynamic options in the intent definition
- IntentHandler에 커스텀 intent type의 IntentHandling 구현, IntentHandling 안에서 동적 파라미터 리스트 입력 가능

class IntentHandler: INExtension {

    override func handler(for intent: INIntent) -> Any {
        // This is the default implementation.  If you want different objects to handle different intents,
        // you can override this and return the handler you want for that particular intent.

        return self
    }

}

extension IntentHandler: ConfigurationIntentHandling {
    func provideParameterOptionsCollection(for intent: ConfigurationIntent, with completion: @escaping (INObjectCollection<NSString>?, Error?) -> Void) {
        var items: [NSString] = []

        items.append("first string")
        items.append("second string")
        items.append("third string")
        items.append("forth string")

        completion(INObjectCollection(items: items), nil)

        // Paramete List With Sections
        /*
        completion(INObjectCollection(sections: [INObjectSection(title: "first section", items: ["first string", "second string"]),
         INObjectSection(title: "second section", items: ["third string", "forth string"])]),
         nil)
         */
    }
}
Widget Color
-
AccentColor

-
BackgroundColor

-
Build Settings

Note: Reboot the simulator to see the change
Widget Deep Link
- small 사이즈의 위젯경우, 위젯 전체에 링크가 걸리는 형태만 지원
- medium, large 사이즈 위젯에서는
Link()구현을 통해 각 리스트별 링크 동작 지원 - 위젯전체 딥링크 : .widgetURL()
- 리스트 일부 딥링크 : Link(){}
Widget Center
- 앱내에서 위젯들의 동작을 컨트롤 가능
Button(action: {
            // WidgetCenter.shared.reloadTimelines(ofKind: "WeatherWidget")
            WidgetCenter.shared.reloadAllTimelines()
        }, label: {
            Text("reload all widget")
        })
Issue
- 위젯뷰내 이미지 URL로 비동기 로드시 이슈
- configurable 위젯 reset 안되는 이슈
Reference
- https://medium.com/swlh/build-your-first-ios-widget-part-3-36ba53033e33
- https://zeddios.tistory.com/1091
-
https://useyourloaf.com/blog/widget-background-and-accent-color/
- https://developer.apple.com/design/human-interface-guidelines/ios/system-capabilities/widgets/
- https://developer.apple.com/documentation/widgetkit
- https://developer.apple.com/documentation/swiftui/widgetbundle
- https://developer.apple.com/documentation/swiftui/widget
- https://developer.apple.com/documentation/widgetkit/timeline
- https://developer.apple.com/documentation/widgetkit/timelineentry
- https://developer.apple.com/documentation/widgetkit/timelineprovider
- https://developer.apple.com/documentation/widgetkit/making-a-configurable-widget
- https://developer.apple.com/documentation/widgetkit/widgetcenter




Leave a comment